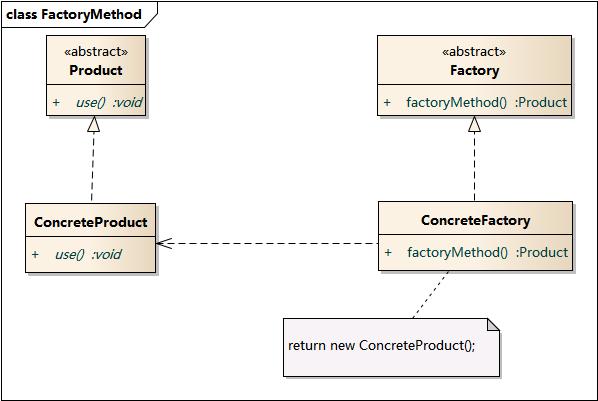
工厂方法模式通过抽象类工厂来定义接口,由工厂子类决定实例化的产品,这样做将产品的实例化延迟到子类,增加新产品只需要增加一个实现父类接口的工厂子类。
下面是示例实现,为了内存管理方便,这里都使用智能指针实现。
首先定义产品类,分别定义了SportCar和Train两种类型的Car:
1
2
3
4
5
6
7
8
9
10
11
12
13
14
15
16
17
18
19
20
21
22
23
24
25
26
27
class Car {public : Car (std::string name, std::string color) : name_ (std::move (name)), color_ (std::move (color)) {} virtual void use () 0 ; virtual ~Car () = default ; protected : std::string name_; std::string color_; }; class SportCar :public Car {public : SportCar (std::string name, std::string color) : Car (std::move (name), std::move (color)) {} void use () override std::cout << "sportCar{" + name_ + "--" + color_ + "} is used" << std::endl; } }; class Train :public Car {public : Train (std::string name, std::string color) : Car (std::move (name), std::move (color)) {} void use () override std::cout << "train{" + name_ + "--" + color_ + "} is used" << std::endl; } };
为了生产这两种类型的产品,需要定义以下抽象工厂类和子类:
1
2
3
4
5
6
7
8
9
10
11
12
13
14
15
16
17
18
19
class CarFactory {public : virtual std::shared_ptr<Car> createCar () 0 ; virtual ~CarFactory () = default ; }; class SportCarFactory :public CarFactory {public : std::shared_ptr<Car> createCar () override { return std::make_shared<SportCar>("Farari" , "red" ); } }; class TrainFactory :public CarFactory {public : std::shared_ptr<Car> createCar () override { return std::make_shared<Train>("FuXing" , "yellow" ); } };
使用的时候需要某一个产品时,只需要从对应的子工厂中获取:
1
2
3
4
5
6
7
8
9
int main () shared_ptr<CarFactory> sportCatFact = make_shared<SportCarFactory>(); shared_ptr<CarFactory> trainFact = make_shared<TrainFactory>(); shared_ptr<Car> sportCat = sportCatFact->createCar (); shared_ptr<Car> train = trainFact->createCar (); sportCat->use (); train->use (); return 0 ; }
1
2
sportCar{Farari--red} is used train{FuXing--yellow} is used
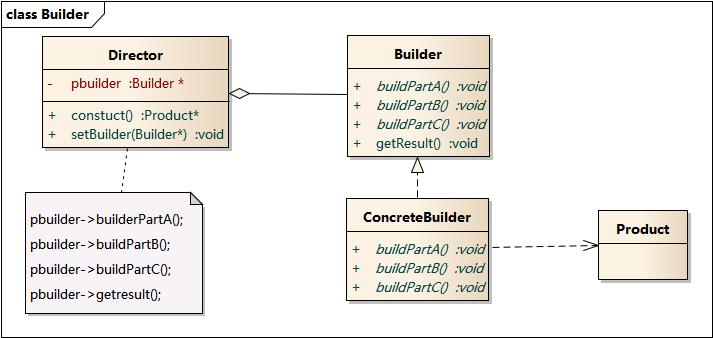
在软件设计中,会有一些比较复杂的对象,这些对象由多个组成部分,创建时需要一步一步进行。为了更好的创建这种类型的对象,可以增加一个创建者类来专门负责这个复杂对象的创建。
下面是示例,
汽车类共有 engine, body, wheel 三个部分需要分别构建:
1
2
3
4
5
6
7
8
9
10
11
12
13
14
15
class Car {public : void setEngine (const std::string& engine) void setBody (const std::string& body) void setWheel (const std::string& wheel) std::string toString () { return "engine:" + engine_ + "; body:" + body_ + "; wheel:" + wheel_; } private : std::string engine_; std::string body_; std::string wheel_; };
使用建造者类Builder来管理汽车类的构建:
1 2 3 4 5 6 7 8 9 10 11 12 13 14 15 16 17 18 19 20 21 22 23 24 25 26 27 28 29 30 31 32 33 34 class CarBuilder {public : virtual void buildEngine (const std::string& engine) virtual void buildBody (const std::string& body) virtual void buildWheel (const std::string& wheel) virtual std::shared_ptr<Car> getCar () return nullptr ; } virtual ~CarBuilder () = default ; protected : CarBuilder () = default ; }; class SportCarBuilder :public CarBuilder{public : SportCarBuilder () : car_ (new Car ()) {} void buildBody (const std::string &body) override car_->setBody (body); } void buildEngine (const std::string &engine) override car_->setEngine (engine); } void buildWheel (const std::string &wheel) override car_->setWheel (wheel); } std::shared_ptr<Car> getCar () override { return car_; } private : std::shared_ptr<Car> car_; };
定义Director类来组织建造者的建造过程(实际有一些建造者实现时不用这个类,而是直接在Builder类中添加一个build方法来得到产品)。
1
2
3
4
5
6
7
8
9
10
11
12
class Director {public : explicit Director (const std::shared_ptr<CarBuilder>& builder) this ->builder_ = builder;} std::shared_ptr<Car> construct () { builder_->buildEngine ("goodEngine" ); builder_->buildBody ("redBody" ); builder_->buildWheel ("4 wheels" ); return builder_->getCar (); } private : std::shared_ptr<CarBuilder> builder_; };
使用时将Builder传给Director并完成复杂产品的构建:
1
2
3
4
5
6
7
int main () auto builder = std::make_shared<SportCarBuilder>(); Director director (builder) ; auto car = director.construct (); std::cout << car->toString () << std::endl; return 0 ; }
其实在Effective Java中第二条提到了当一个类的构造参数过多时可以用建造者模式来重构,感兴趣的可以看一下。
单例模式也是一种创建型模式,在软件中,可能会存在有的类只有一个全局的实例,而且这个实现会被各个部分访问。为了保证一个类只被实例化一次,可以使用单例模式(Singleton)来设计。实际上,单例模式在软件设计中使用非常多。
下面是单例模式的示例实现,为了避免被多次实例化产生多各类,需要将构造函数定义成私有的,并通过静态方法来返回这个唯一的对象(定义为私有静态成员变量)。
1
2
3
4
5
6
7
8
9
10
11
12
13
14
15
16
class Singleton {public : static std::shared_ptr<Singleton> getInstance () if (!instance_) { instance_ = std::shared_ptr<Singleton>(new Singleton); } return instance_; } void useInstance () std::cout << "use instance" << std::endl; } private : Singleton () = default ; static std::shared_ptr<Singleton> instance_; }; std::shared_ptr<Singleton> Singleton::instance_ = nullptr ;
使用的时候通过静态方法来获取对象实例:
1
2
3
4
5
int main () auto instance = Singleton::getInstance (); instance->useInstance (); return 0 ; }
本文简单介绍了创建型设计模式中的三种常见的设计模式,为了设计出低耦合可复用的软件,设计模式十分重要,但是要熟练运用设计模式却并不是很简单。学习设计模式至少会让我们看别人代码的时候理解别人的设计思路,文中设计模式的结构图来源会放在参考链接里,文中的代码在:https://github.com/xiaoqieF/Design-Pattern-notes
https://design-patterns.readthedocs.io/zh_CN/latest/creational_patterns/factory_method.html https://www.runoob.com/design-pattern/design-pattern-tutorial.html
此外,本文的代码可以在https://github.com/xiaoqieF/Design-Pattern-notes