责任链(Chain of Responsibility)模式是一种处理请求的方式,一个请求可能需要多个接收方顺序处理,故可以将所有接收者按照顺序组成一个责任链,对于链中的每个接收者,如果不能处理请求就将其传递给下一个接收者。
这里举的是一个日志的例子,日志一般来说有多个记录等级,这些不能等级的日志器组成一条链,当前日至器处理完请求(或者不处理请求)后,将其传递给下一级日志器。
首先定义日志器抽象类,这个日志器持有一个新的日志器,如果当前日志记录请求等级满足日志器要求时,进行一条日志记录。并将请求传递给下一个日志器。
1
2
3
4
5
6
7
8
9
10
11
12
13
14
15
16
17
18
19
20
21
22
23
24
25
26
27
enum class LoggerLevel { INFO, DEBUG, ERROR }; class AbstractLogger {public : explicit AbstractLogger (LoggerLevel level) : level_(level) { virtual ~AbstractLogger () = default ; void setNextLogger (const std::shared_ptr<AbstractLogger>& nextLogger) nextLogger_ = nextLogger; } void logMessage (LoggerLevel level, const std::string& message) if (level_ <= level) { log (message); } if (nextLogger_) { nextLogger_->logMessage (level, message); } } protected : virtual void log (const std::string& message) 0 ; LoggerLevel level_; std::shared_ptr<AbstractLogger> nextLogger_; };
然后定义一系列的具体日志器类,这些类实现了父亲的抽象方法log,定义了具体记录日志的方式。
1
2
3
4
5
6
7
8
9
10
11
12
13
14
15
16
17
18
19
20
21
22
23
24
25
26
class ConsoleLogger :public AbstractLogger {public : explicit ConsoleLogger (LoggerLevel level) : AbstractLogger(level) { void log (const std::string &message) override std::cout << "Console log:" << message << std::endl; } }; class ErrorLogger :public AbstractLogger {public : explicit ErrorLogger (LoggerLevel level) : AbstractLogger(level) { void log (const std::string &message) override std::cout << "Error log:" << message << std::endl; } }; class FileLogger :public AbstractLogger {public : explicit FileLogger (LoggerLevel level) : AbstractLogger(level) { void log (const std::string &message) override std::cout << "File log:" << message << std::endl; } };
使用的时候,将具体的日志器串成一条责任链,只需要将请求交给责任链处理就行,
1
2
3
4
5
6
7
8
9
10
11
12
13
14
15
16
std::shared_ptr<AbstractLogger> getChainOfLoggers () { std::shared_ptr<AbstractLogger> errorLogger = std::make_shared<ErrorLogger>(LoggerLevel::ERROR); std::shared_ptr<AbstractLogger> fileLogger = std::make_shared<FileLogger>(LoggerLevel::DEBUG); std::shared_ptr<AbstractLogger> consoleLogger = std::make_shared<ConsoleLogger>(LoggerLevel::INFO); errorLogger->setNextLogger (fileLogger); fileLogger->setNextLogger (consoleLogger); return errorLogger; } int main () auto loggerChain = getChainOfLoggers (); loggerChain->logMessage (LoggerLevel::INFO, "some message" ); loggerChain->logMessage (LoggerLevel::DEBUG, "debug message" ); loggerChain->logMessage (LoggerLevel::ERROR, "error message" ); }
实际上,责任链模式在 Java 中有广泛的应用,最熟悉的就是 Servlet 中的过滤器 Filter,其对请求和响应进行拦截,可以同时配置多个过滤器,每个过滤器有不同的职责,当前过滤器处理完请求之后请求还会被下一个过滤器拦截。Spring 框架中的拦截器也是类似的工作原理,都运用了责任链模式。
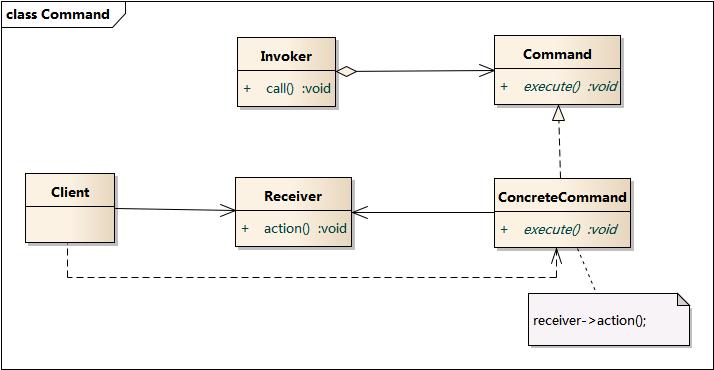
命令模式(Command)将一个请求封装成一个对象,让请求的发送者和接收者解耦,不用相互持有对方的引用。
这里有一个能够具体处理请求的 Stock 类,该类可以处理具体的买卖股票事务,
1
2
3
4
5
6
7
8
9
10
11
class Stock {public : void buy () std::cout << "buy stock:" << name_ << std::endl; } void sell () std::cout << "sell stock:" << name_ << std::endl; } private : std::string name_ = "ABC" ; };
我们可以使用命令模式将这两个方法封装成相应的命令对象,调用该对象的 execute()方法来执行具体的命令。
1
2
3
4
5
6
7
8
9
10
11
12
13
14
15
16
17
18
19
20
21
22
23
24
25
class Command {public : virtual ~Command () = default ; virtual void execute () 0 ; }; class SellCommand :public Command{public : explicit SellCommand (std::shared_ptr<Stock> stock) : stock_(std::move(stock)) { void execute () override stock_->sell (); } private : std::shared_ptr<Stock> stock_; }; class BuyCommand :public Command {public : explicit BuyCommand (std::shared_ptr<Stock> stock) : stock_(std::move(stock)) { void execute () override stock_->buy (); } private : std::shared_ptr<Stock> stock_; };
调用者可以将具体的命令对象组成一个序列,统一对命令进行处理:
1
2
3
4
5
6
7
8
9
10
11
12
13
class Invoker {public : void addCommand (const std::shared_ptr<Command>& command) commandList_.push_back (command); } void invoke () for (auto & c : commandList_) { c->execute (); } } private : std::vector<std::shared_ptr<Command>> commandList_; };
使用如下:
1
2
3
4
5
6
7
8
9
10
int main () auto stock = std::make_shared<Stock>(); std::shared_ptr<Command> buyCommand = std::make_shared<BuyCommand>(stock); std::shared_ptr<Command> sellCommand = std::make_shared<SellCommand>(stock); auto invoker = std::make_shared<Invoker>(); invoker->addCommand (buyCommand); invoker->addCommand (sellCommand); invoker->invoke (); return 0 ; }
实际上,使用命令模式实现了调用者和接收者之间的解耦,但是也增加了系统的复杂程度,将每个命令都封装成对象,导致系统中存在大量的命令对象。对于简单的情况,不如直接通过调用者来调用接收者的方法来的有效。
命令模式使用较多的一个场景是需要支持 Undo 和 Redo 操作,在 Command 接口中添加这些操作,就可以方便对对命令对象实现的功能进行控制了。
迭代器模式(Iterator)提供了一种能够顺序访问容器中元素的方法,而不用暴露其内部实现。实际上大多数编程语言的容器类都提供了迭代器,迭代器模式是一种非常常见的设计模式。
这里我们实现一个简单的线性容器(类似于C++中的vector和Java中的ArrayList),只是为了展示迭代器的实现,所以很多其他功能接口都没有实现,迭代器也只是实现了部分功能,如++,==等。
1
2
3
4
5
6
7
8
9
10
11
12
13
14
15
16
17
18
19
20
21
22
23
24
25
26
27
28
29
30
31
32
33
34
35
36
37
38
39
40
41
42
43
44
45
46
47
48
49
50
51
52
53
54
55
56
57
58
59
60
61
62
63
64
65
66
67
68
69
70
71
template <class T >class Array {public : Array () { start_ = new T[INIT_SIZE]; end_ = start_; } ~Array () { delete [] start_; } void push_back (const T& t) if (end_ - start_ >= capacity_) { T* newStart = new T[capacity_ * 2 ]; memcpy (newStart, start_, capacity_ * sizeof delete [] start_; start_ = newStart; end_ = start_ + capacity_; capacity_ = capacity_ * 2 ; } *end_++ = t; } int size () const return end_ - start_; } int capacity () const return capacity_; } T operator [](int i) { return *(start_ + i); } class Iterator { public : Iterator (T* pointer):pointer_ (pointer) {} T& operator *() { return *pointer_; } Iterator& operator ++() { ++pointer_; return *this ; } Iterator operator ++(int ) { T* tmp = pointer_; ++pointer_; return Iterator (tmp); } bool operator ==(const Iterator& rhs) { return pointer_ == rhs.pointer_; } bool operator !=(const Iterator& rhs) { return !operator ==(rhs); } bool operator >(const Iterator& rhs) { return pointer_ - rhs.pointer_ > 0 ; } private : T* pointer_; }; Iterator begin () { return Iterator (start_); } Iterator end () { return Iterator (end_); } private : static const int INIT_SIZE = 10 ; T* start_ = nullptr ; T* end_ = nullptr ; int capacity_ = INIT_SIZE; };
实际上对于这个简单的线性容器而言,迭代器的行为和裸指针的行为几乎是一样的。我们测试一下迭代器的功能:
1
2
3
4
5
6
7
8
9
10
11
12
13
int main () Array<int > arr; for (int i = 0 ; i < 20 ; ++i) { arr.push_back (i); } for (auto it = arr.begin (); it != arr.end (); ++it) { std::cout << *it << std::endl; } for (const int & it : arr) { std::cout << it << std::endl; } return 0 ; }
经过测试,迭代器是正常工作的。
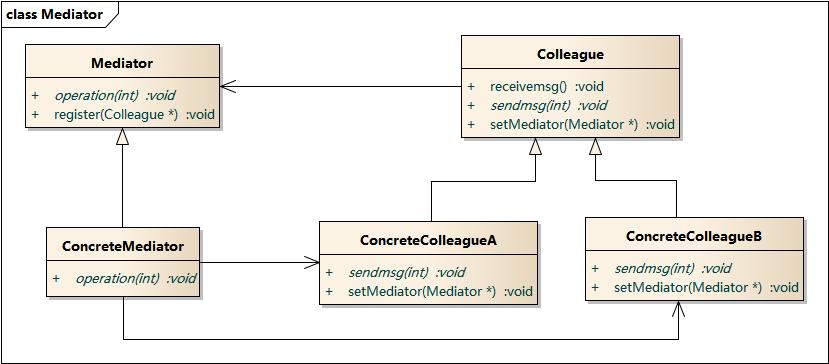
中介者模式(Mediator Pattern)用来简化多个对象之间的通信,为了避免各个对象之间显示的相互引用,可以提供一个中介类,这样是的各个类之间松耦合。中介模式的本质是将多个类之间的交互变成了各个类和中介类之间的交互。
这里举一个聊天室的例子,聊天室有多个用户,用户之间的对话原本需要通过拥有其它用户的引用来实现。现在添加一个中介者类 ChatRoom,这样每个用户只需要持有一个中介者类的引用,每次需要发消息只需要和中介之间通信就行。
1
2
3
4
5
6
7
8
9
10
11
12
13
14
15
16
17
18
19
20
class ChatRoom {public : ChatRoom () = default ; bool registerUser (const std::shared_ptr<User>& user, const std::string& name) if (users_.find (name) == users_.end ()) { users_.insert ({name, user}); return true ; } else { return false ; } } void sendMsg (const std::string& name, const std::string& msg) auto it = users_.find (name); if (it != users_.end ()) { std::cout << name << " send: " << msg << std::endl; } } private : std::map<std::string, std::shared_ptr<User>> users_; };
为了避免头文件相互引用,这里将 User类头文件和源文件分开,并前向声明ChatRoom类,User.h:
1
2
3
4
5
6
7
8
9
10
11
12
13
14
15
16
class ChatRoom ;class User {public : explicit User (std::string name, const std::shared_ptr<ChatRoom>& room) : name_(std::move(name)), room_(room) { } std::string getName () const { return name_; } void sendMsg (const std::string& msg) private : std::string name_; std::weak_ptr<ChatRoom> room_; };
User.cpp:
1
2
3
4
5
6
void User::sendMsg (const std::string &msg) auto roomPtr = room_.lock (); if (roomPtr) { roomPtr->sendMsg (name_, msg); } }
这里需要注意的是,ChatRoom和User之间存在智能指针的相互引用,如果都使用shared_ptr的话会发生内存泄漏,两个对象都不会被销毁掉。解决的办法是将其中一方的引用改为weak_ptr,这里让User持有ChatRoom的弱引用(weak_ptr)。
使用的时候,每个用户发送消息都只会直接和中介聊天室交互:
1
2
3
4
5
6
7
8
9
10
int main () auto chatRoom = std::make_shared<ChatRoom>(); auto mike = std::make_shared<User>("mike" , chatRoom); auto bob = std::make_shared<User>("bob" , chatRoom); chatRoom->registerUser (mike, mike->getName ()); chatRoom->registerUser (bob, bob->getName ()); mike->sendMsg ("hello" ); bob->sendMsg ("world" ); return 0 ; }
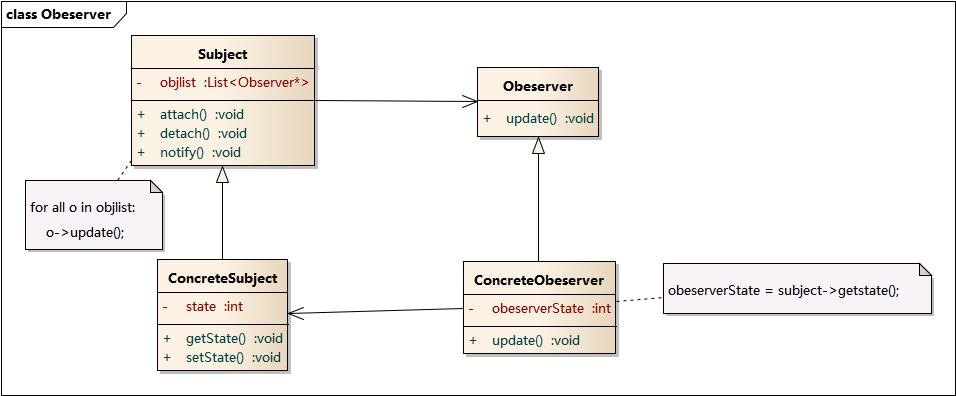
观察者模式(Observer Pattern)定义了对象之间的一对多 的关系,当一个对象被修改时,其它多个依赖它的对象都会得到通知。
观察者模式又称为发布-订阅模式(Publish-Subscribe),可以同时有多个订阅者订阅某个主题(Subject),当主题发生变化的时候会通知各个订阅者。很多系统都是使用这套机制进行通信的,例如机器人操作系统 ROS,它将一个机器人系统分成若干个节点,每个节点作为订阅者可以订阅自己感兴趣的话题(Topic),如某个传感器的值,当传感器值发生变化的时候,这些订阅的节点可以知道。
这里还是用 C++ 实现一个典型的观察者模式,由于 C++ 智能指针 shared_ptr 是基于引用计数工作的,所以这里还是需要使用 weak_ptr 来避免循环引用问题。同时避免两个头文件之间相互 include,将其中一者使用头文件和源文件相互分离的方法。
首先定义一个主题,这个主题有一个 int 型的状态变量,当这个变量变化的时候通知所有订阅了该主题的对象(调用这些对象的update()方法):
1
2
3
4
5
6
7
8
9
10
11
12
13
14
15
16
17
18
19
20
21
22
23
24
25
26
27
class Subject {public : int getState () const return state_; } void setState (int state) state_ = state; notifyAllObservers (); } void attach (const std::shared_ptr<Observer>& observer) observers_.push_back (observer); } void notifyAllObservers () for (const auto & o : observers_) { auto ptr = o.lock (); if (ptr) { ptr->update (); } } } private : int state_ = 0 ; std::vector<std::weak_ptr<Observer>> observers_; };
对于观察者(订阅方),它们继承至抽象类Observer,Observer.h:
1
2
3
4
5
6
7
8
9
10
11
12
13
14
15
16
17
18
19
20
21
22
23
24
25
class Subject ;class Observer :public std::enable_shared_from_this<Observer>{public : virtual ~Observer () = default ; virtual void attachSubject (const std::shared_ptr<Subject>& subject) virtual void update () 0 ; protected : std::shared_ptr<Subject> subject_; }; class DecObserver :public Observer{public : void update () override }; class OctObserver :public Observer {public : void update () override }; class HexObserver :public Observer{public : void update () override };
在 Observer.cpp 中实现这些方法:
1
2
3
4
5
6
7
8
9
10
11
12
13
14
void Observer::attachSubject (const std::shared_ptr<Subject>& subject) subject_ = subject; subject_->attach (shared_from_this ()); } void DecObserver::update () std::cout << "Dec observe:" << std::dec << subject_->getState () << std::endl; } void OctObserver::update () std::cout << "Oct observe:" << std::oct << subject_->getState () << std::endl; } void HexObserver::update () std::cout << "Hex observe:" << std::hex << subject_->getState () << std::endl; }
使用的时候,先创建主题和观察者,并设置观察者和主题之间的联系,然后当主题状态发生改变时,这些观察者都能够发现(他们的update()都会被调用)。
1
2
3
4
5
6
7
8
9
10
11
12
13
14
15
int main () auto subject = std::make_shared<Subject>(); std::shared_ptr<Observer> dec = std::make_shared<DecObserver>(); std::shared_ptr<Observer> hex = std::make_shared<HexObserver>(); std::shared_ptr<Observer> oct = std::make_shared<OctObserver>(); dec->attachSubject (subject); hex->attachSubject (subject); oct->attachSubject (subject); subject->setState (128 ); return 0 ; }
状态模式(State Pattern)允许对象在内部状态改变时改变它的行为,看起来好像修改了它的类。
直接举例说明,首先定义状态类State,这是一个抽象类,doAction接口定义了不同状态时的行为,具体实现有FirstState和SecondState子类,这里将他们实现成了 Singleton。
1
2
3
4
5
6
7
8
9
10
11
12
13
14
15
16
17
18
19
20
21
22
23
24
25
26
27
28
29
30
31
32
33
34
35
36
37
38
39
40
41
class State {public : virtual ~State () = default ; virtual void doAction () 0 ; }; class FirstState :public State {public : static std::shared_ptr<State> instance () if (!instance_) { instance_ = std::shared_ptr<State>(new FirstState ()); } return instance_; } void doAction () override std::cout << "In FirstState" << std::endl; } private : FirstState () = default ; static std::shared_ptr<State> instance_; }; std::shared_ptr<State> FirstState::instance_ = nullptr ; class SecondState :public State {public : static std::shared_ptr<State> instance () if (!instance_) { instance_ = std::shared_ptr<State>(new SecondState ()); } return instance_; } void doAction () override std::cout << "In SecondState" << std::endl; } private : SecondState () = default ; static std::shared_ptr<State> instance_; }; std::shared_ptr<State> SecondState::instance_ = nullptr ;
Context类持有一个State实例,根据当前所处的不同状态来表现出不同的行为:
1
2
3
4
5
6
7
8
9
10
11
12
class Context {public : Context () : state_ (FirstState::instance ()) {} void setState (const std::shared_ptr<State>& state) state_ = state; } void request () state_->doAction (); } private : std::shared_ptr<State> state_; };
改变状态能改变行为:
1
2
3
4
5
6
7
int main () auto context = std::make_shared<Context>(); context->request (); context->setState (SecondState::instance ()); context->request (); return 0 ; }
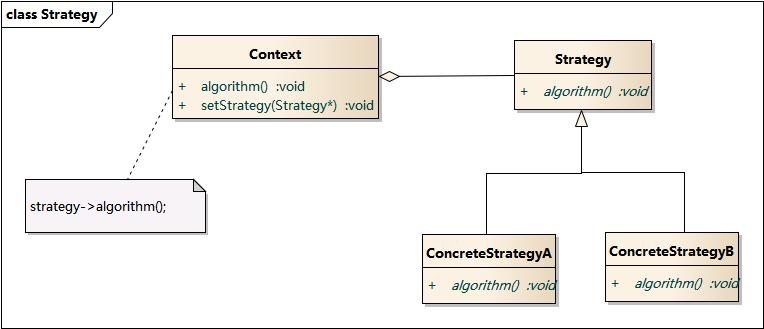
策略模式(Strategy Pattern)是较为常用的设计模式之一,策略模式将一系列算法封装到对象中(策略对象),通过使用不同的策略对象能够灵活的使用其中某一个算法。
比较好理解,首先定义一个抽象类Strategy,实现其中的doOperation方法就可以定义一种算法。分别实现几个具体的算法子类:
1
2
3
4
5
6
7
8
9
10
11
12
13
14
15
16
17
18
19
20
21
22
23
24
25
26
class Strategy {public : virtual ~Strategy () = default ; virtual int doOperation (int num1, int num2) 0 ; }; class Subtract :public Strategy {public : int doOperation (int num1, int num2) override return num1 - num2; } }; class Multiply :public Strategy {public : int doOperation (int num1, int num2) override return num1 * num2; } }; class Add :public Strategy {public : int doOperation (int num1, int num2) override return num1 + num2; } };
Context类能够通过设置Strategy对象来改变具体的算法:
1
2
3
4
5
6
7
8
9
10
11
12
class Context {public : explicit Context (std::shared_ptr<Strategy> strategy) : strategy_(std::move(strategy)) { int executeStrategy (int num1, int num2) return strategy_->doOperation (num1, num2); } void setStrategy (const std::shared_ptr<Strategy>& strategy) strategy_ = strategy; } private : std::shared_ptr<Strategy> strategy_; };
1
2
3
4
5
6
7
8
9
int main () auto context = std::make_shared<Context>(std::shared_ptr<Strategy>(new Subtract)); std::cout << context->executeStrategy (4 , 2 ) << std::endl; context->setStrategy (std::shared_ptr<Strategy>(new Multiply)); std::cout << context->executeStrategy (4 , 2 ) << std::endl; context->setStrategy (std::shared_ptr<Strategy>(new Add)); std::cout << context->executeStrategy (4 , 2 ) << std::endl; return 0 ; }
https://design-patterns.readthedocs.io/zh_CN/latest/structural_patterns/structural.html https://www.runoob.com/design-pattern/design-pattern-tutorial.html https://www.liaoxuefeng.com/wiki/1252599548343744/1264742167474528
此外,本文的代码可以在https://github.com/xiaoqieF/Design-Pattern-notes