Spring框架(三):动态代理和AOP

前言

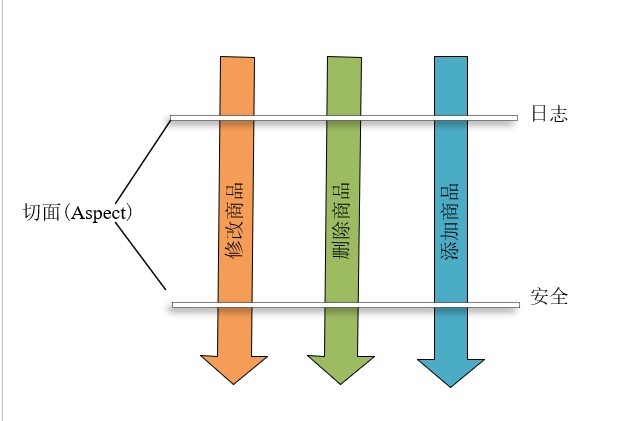
Aspect Oriented Programming(AOP)翻译为中文是“面向切面编程”,是指可以通过预编译方式和运行其动态代理实现在不修改源代码的情况下给程序动态统一添加某种特定功能的一种技术。

下面列举一个场景,你目前已经完成了商品服务中多项功能的开发,例如添加商品、删除商品以及修改商品。

1
2
3
4
5
6
7
8
9
10
11
12
13
14
public class GoodsServiceImpl implements GoodsService {
@Override
public void addGoods(Goods goods) {
System.out.println("添加商品:" + goods);
}
@Override
public void removeGoods(int id) {
System.out.println("删除商品ID:" + id);
}
@Override
public void updateGoods(Goods goods) {
System.out.println("更新商品:" + goods);
}
}

这时候,你的老板希望能够给每一次商品服务调用时打印一个日志。最直观的实现方式是编写一个打印日志方法,然后往每个商品服务方法中插入该日志方法。这是一件很麻烦的事情,需要多处修改代码。

AOP提供了一种“横切式”的编程模式能够实现上述需求,通过简单的切面操作实现代码的增强。

实现AOP的方式就是采用设计模式中的「代理模式」,通过对服务类进行代理,调用服务的时候实际上是调用了代理的类相关方法,而代理类方法则是原方法的增强。从而实现了不需要修改源码却能够增强原方法的效果。 实现AOP有静态代理和动态代理两种实现方式:

  1. 静态代理实现AOP,在编译阶段对源码进行修改,生成静态代理类,如AspectJ实现,这种方式需要扩展编译器,定义了新的关键字,不够灵活。
  2. 动态代理实现AOP,在运行阶段动态生成代理对象,一般是通过JDK动态代理或第三方库实现,性能受一定影响,但很灵活。Spring AOP实现就是基于动态代理实现的。

在Java中,通常有使用JDK动态代理以及使用CGLIB第三方库实现动态代理两种方式,接下来先介绍以下动态代理的这两种实现,然后再介绍Spring AOP的使用方法。

动态代理

JDK动态代理

JDK动态代理主要通过两个反射包中的类或接口来实现:java.lang.reflect.InvocationHandler接口和java.lang.reflect.Proxy类。其通过反射机制实现被代理类方法的增强。

其中InvocationHandler接口用于增强被代理对象的方法,其中有一个必须实现的方法:

1
2
public Object invoke(Object proxy, Method method, Object[] args)
throws Throwable;

这个方法也就是实现方法增强的关键,从这个方法参数中,我们可以取得代理对象以及被代理对象的一些信息,包括:

  1. proxy:代理对象实例。
  2. method:「被代理对象」被调用的方法,当调用「代理对象」的方法时,就会执行InvocationHandler中的invoke方法并将「被代理对象」的同名方法作为参数传入,通过这个参数我们就能够通过反射机制调用「被代理对象」的方法。
  3. args:调用方法的参数。

这里我们试图增强上述商品服务类的所有方法,为其所有方法调用前加上一个打印日志功能:

1
2
3
4
5
6
7
8
9
10
11
12
13
14
15
16
17
18
19
20
public class LogHandler implements InvocationHandler {
Object target;

public LogHandler(Object target) {
this.target = target;
}

@Override
public Object invoke(Object proxy, Method method, Object[] args) throws Throwable {
// 在方法调用前打印日志
log(method);
// 通过反射调用被代理对象的方法
Object res = method.invoke(target, args);
return res;
}

private void log(Method method) {
System.out.println(method.getDeclaringClass() + method.getName() + "被调用前!");
}
}

这里我们实现了一个LogHandler类实现了InvocationHandler接口,并在invoke方法中首先调用打印日志方法log(),然后通过反射调用了被代理对象的方法。

Proxy类用于创建代理对象,通过其静态工厂方法newProxyInstance()生成代理对象:

1
public static Object newProxyInstance(ClassLoader loader, Class<?>[] interfaces, InvocationHandler h) 

三个参数分别为:

  1. 定义代理类使用的类加载器
  2. 代理类需要实现的接口列表
  3. 代理类方法被调用时,就往这个InvocationHandler实例派发。

下面就是创建代理类并调用方法:

1
2
3
4
5
6
7
8
9
10
11
12
13
14
public class MyTest {
public static void main(String[] args) {
GoodsService service = new GoodsServiceImpl();
InvocationHandler handler = new LogHandler(service);
// 通过Proxy的工厂方法创建动态代理类
GoodsService service1 = (GoodsService) Proxy.newProxyInstance(
service.getClass().getClassLoader(),
service.getClass().getInterfaces(),
handler);
// 调用动态代理类的方法,会被派发至LogHandler的invoke方法处
// 故结果是增强后的结果
service1.addGoods(new Goods());
}
}

运行结果:

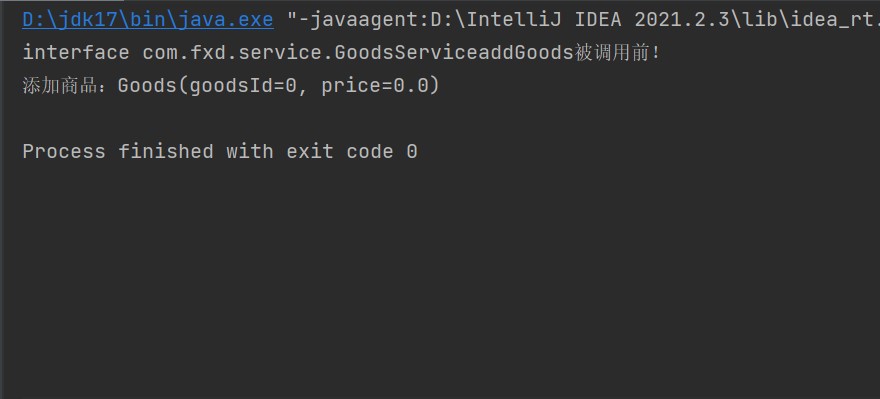
需要注意的是,从实现的过程我们发现,创建动态代理类时必须将其要实现的接口列表作为参数传入,也就是说被代理对象必须是要实现某个或某些接口的,且只能对这些接口中的方法进行代理。

CGLIB动态代理

CGLIB是一个功能强大的代码生成包,能够为没有实现接口的类提供动态代理,即弥补了JDK动态代理的缺点,通常认为其效率比JDK动态代理要高,但是项目官方说明了在新版的JDK(17+)中可能不会很好的工作。https://github.com/cglib/cglib。且随着JDK版本提高,JDK动态代理的效率也逐渐提高。

CGLIB底层使用ASM来操作字节码生成目标类的子类,并通过拦截器来实现方法的增强。需要注意的是,使用CGLIB不能对final类或final方法实现代理。

为了使用CGLIB动态代理,需要引入依赖:

1
2
3
4
5
<dependency>
<groupId>cglib</groupId>
<artifactId>cglib</artifactId>
<version>3.3.0</version>
</dependency>

类似于JDK动态代理实现调用处理器,CGLIB中需要先实现方法拦截器接口:

1
2
3
4
5
6
7
8
9
10
11
12
13
public class LogInterceptor implements MethodInterceptor {
@Override
public Object intercept(Object object, Method method, Object[] args, MethodProxy methodProxy) throws Throwable {
log(method);
// 调用代理类实例上methodProxy方法的父类方法,即被代理方法。
Object res = methodProxy.invokeSuper(object, args);
return res;
}

private void log(Method method) {
System.out.println(method.getDeclaringClass() + method.getName() + "被调用前!");
}
}

其中必须实现的方法是:

1
public Object intercept(Object object, Method method, Object[] args, MethodProxy methodProxy) 

四个参数分别是:

  1. object:生成的代理对象。
  2. method:「被代理对象」被调用的方法,或者说被拦截的方法。
  3. args:调用方法的参数。
  4. methodProxy:生成的代理类对方法的代理引用。

实现完方法拦截器之后,需要通过Enhancer类来创建代理类:

1
2
3
4
5
6
7
8
9
10
11
12
13
14
15
public class MyTest {
public static void main(String[] args) {
GoodsServiceImpl service = new GoodsServiceImpl();
Enhancer enhancer = new Enhancer();
// 设置被代理类
enhancer.setSuperclass(GoodsServiceImpl.class);
// 设置方法拦截器
enhancer.setCallback(new LogInterceptor());
// 生成代理类
GoodsServiceImpl proxy = (GoodsServiceImpl) enhancer.create();
// 调用代理类方法,被增强
proxy.addGoods(new Goods());
}
}

Spring AOP

Spring中的AOP就是通过动态代理方式实现的,介绍完动态代理技术之后,来介绍一下Spring中AOP的使用方法。首先介绍一些AOP中的概念,这些概念并不是很直观,但已经成为了通用说法了。

  • 切面(Aspect):一个横切关注点的模块化,例如上述的日志或事务管理就是横切关注点的例子,切面由 切点(PointCut)通知(Advice) 组成。
  • 连接点(Join point):程序执行过程中的一个点,如方法的执行或异常的处理。在AOP中,连接点总是代表一个方法的执行。
  • 切点(PointCut):某些特定的用于添加 通知(Advice) 的连接点,在Spring中通过AspectJ切入点语法来匹配。
  • 通知(Advice):对方法的增强处理,作用于切点(PointCut)。Spring AOP中支持5种通知类型,分别是:Before,After,AfterReturning,AfterThrowing,Around,用于指示在在切点的何处实现增强。这在后面均会演示。
  • 织入(Weaving):将切面和对象连接起来从而创建一个增强的对象,这个过程称为织入。

尽管概念比较抽象,在Spring中实现AOP还是比较简单。

首先,Spring支持AspectJ中切点指示器如下,即可以通过下标来指定切点。

项目类型 描述
arg() 限定连接点方法参数为指定类型
@args() 限定连接点方法参数为注解指定类型
execution() 用于匹配是连接点的执行方法,这是最主要的切点匹配器
this() 限制连接点匹配AOP代理的bean引用为指定类型的类
target() 限制连接点匹配目标对象为指定类型的类
@target() 限制连接点匹配特定的执行对象,这些对象对应的类要具备指定类型的注解
within() 限制连接点匹配指定的类型
@within() 限制连接点匹配注解所标注的类型
@annotation 限制匹配带有指定注解连接点

其中execution()指示器是执行匹配,是我们定义切点时的主要使用的指示器。常用的方法执行指示器如下:

1
2
3
4
5
6
7
8
9
// 切点指示器,第一个*号表示任意返回类型,第二个*号表示AccountService接口中的任意方法
// 参数中的..表示任意参数类型和参数个数
execution(* com.xyz.service.AccountService.*(..))

// 匹配service包下的所有方法
execution(* com.xyz.service.*.*(..))

// 匹配所有以set开头的方法
execution(* set*(..))

多个匹配之间可以通过&&,||,!连接,表示逻辑关系,但在xml配置文件中,这些符号有其它含义,故使用and,or,not来表示。

Spring AOP可以通过注解实现或配置实现,下面分别演示。

通过注解实现

重点是编写切面实现类:

1
2
3
4
5
6
7
8
9
10
11
12
13
14
15
16
17
18
19
20
21
22
23
24
25
26
27
28
29
30
31
32
33
34
35
36
37
38
39
40
41
package com.fxd.AspectJ;

import org.aspectj.lang.ProceedingJoinPoint;
import org.aspectj.lang.annotation.*;
import org.springframework.stereotype.Component;

@Aspect
@Component
public class GoodsAop {

@Pointcut("execution(* com.fxd.service.GoodsService.*(..))")
public void pointCut() {}

@Before("pointCut()")
public void log(){
System.out.println("方法执行前....");
}

@After("pointCut()")
public void log1(){
System.out.println("方法执行后....");
}

@AfterReturning("pointCut()")
public void log2(){
System.out.println("方法返回后....");
}

@Around("pointCut()")
public void log3(ProceedingJoinPoint pj) {
try {
System.out.println("BeforeAround ...");
pj.proceed();
System.out.println("AfterAround ...");
} catch (Throwable throwable) {
throwable.printStackTrace();
}
}
}


首先通过@Aspect将该类标记为切面(Aspect),通过@Component将切面注入容器(不要忘记开启包扫描)。通过@PointCut注解定义一个切点(PointCut),然后通过@Before,@After,@AfterReturning,@Around分别定义不同类型的通知(Advice),定义通知时需要引用上面定义的切点。也可以不引用已定义切点而是直接指定切点:@Before("execution(* com.fxd.service.GoodsService.*(..))")

定义完切面类后,这里使用基于Java的配置,创建AppConfig类:

1
2
3
4
5
6
7
8
9
10
@Configuration
@ComponentScan("com.fxd")
@EnableAspectJAutoProxy
public class AppConfig {

@Bean
public GoodsService goodsService() {
return new GoodsServiceImpl();
}
}

这里通过@ComponentScan指定了扫描包,为了将上面的切面所在包扫描进去,然后通过@EnableAspectJAutoProxy开启动态代理。

最后我们从容器中取到goodsServicebean,并调用某个方法看是否实现了增强:

1
2
3
4
5
6
7
public class MyTest {
public static void main(String[] args) {
ApplicationContext applicationContext = new AnnotationConfigApplicationContext(AppConfig.class);
GoodsService service = applicationContext.getBean("goodsService", GoodsService.class);
service.addGoods(new Goods(12, 21));
}
}

最后运行结果如下(细心的朋友可能发现这次运行的jdk版本变为8了,上面的图还是17,这是因为在写上面CGLIB代理例子的时候,jdk17版本不能使用CGLIB库,于是我重装了😀):

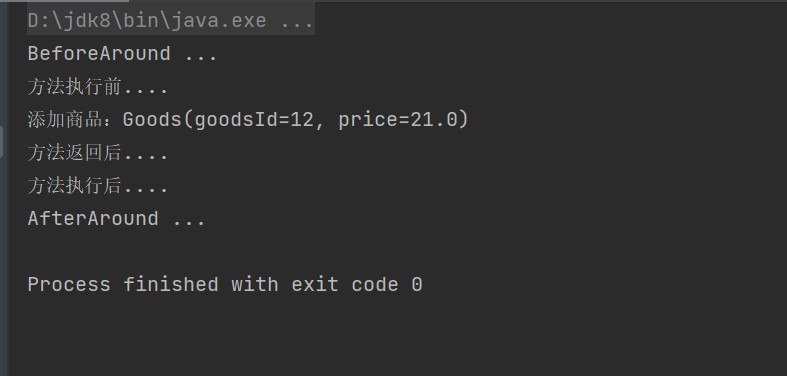
不管怎么说,确实是实现了增强的。总结一些要点就是:

  1. 首先定义切面(Aspect),并在切面(Aspect)中定义切点(PointCut)以及通知(Advice)。
  2. 将切面注入容器(通过注解和包扫描注入),并开启代理@EnableAspectJAutoProxy

基于xml配置实现

基于XML配置文件实现本质上和基于注解实现是一样的。首先我们将切面类的注解移除:

1
2
3
4
5
6
7
8
9
10
11
12
13
14
15
16
17
18
19
20
21
22
23
24
public class GoodsAop {

public void log(){
System.out.println("方法执行前....");
}

public void log1(){
System.out.println("方法执行后....");
}

public void log2(){
System.out.println("方法返回后....");
}

public void log3(ProceedingJoinPoint pj) {
try {
System.out.println("BeforeAround ...");
pj.proceed();
System.out.println("AfterAround ...");
} catch (Throwable throwable) {
throwable.printStackTrace();
}
}
}

然后在配置文件applicationContext.xml中进行如下配置:

1
2
3
4
5
6
7
8
9
10
11
12
13
14
15
16
17
18
19
20
21
22
23
24
<?xml version="1.0" encoding="UTF-8"?>
<beans xmlns="http://www.springframework.org/schema/beans"
xmlns:xsi="http://www.w3.org/2001/XMLSchema-instance"
xmlns:aop="http://www.springframework.org/schema/aop"
xsi:schemaLocation="http://www.springframework.org/schema/beans
http://www.springframework.org/schema/beans/spring-beans.xsd
http://www.springframework.org/schema/aop
https://www.springframework.org/schema/aop/spring-aop.xsd">

<bean id="goodsService" class="com.fxd.service.GoodsServiceImpl"/>
<bean id="goodsAop" class="com.fxd.AspectJ.GoodsAop"/>

<aop:config>
<aop:pointcut id="point" expression="execution(* com.fxd.service.GoodsService.*(..))"/>

<aop:aspect ref="goodsAop">
<aop:before method="log" pointcut-ref="point"/>
<aop:after method="log1" pointcut-ref="point"/>
<aop:after-returning method="log2" pointcut-ref="point"/>
<aop:around method="log3" pointcut-ref="point"/>
</aop:aspect>
</aop:config>

</beans>

AOP配置由一对<aop:config>包裹,内部定义所有的配置,同样的使用<aop:pointcut>标签定义一个切点;使用<aop:aspect>定义一个切面,切面的内部需要定义通知,如前置通知<aop:before>,通知需要指定引用的切点。

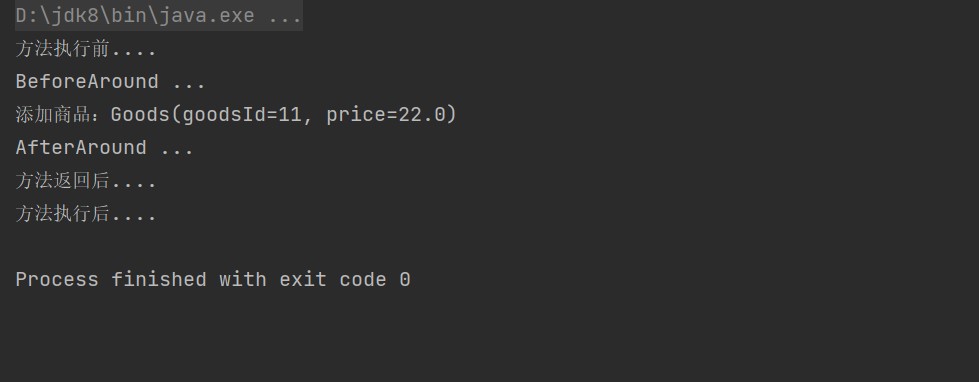
最后执行结果如下,我发现顺序和上面使用注解配置时有所不同,需要注意一下。

总结

为了对Spring AOP有个较为清晰的认识,以其实现方式「动态代理」入手,介绍了Java中实现动态代理的两种常用方式:JDK动态代理和CGLIB动态代理,这两种方式在Spring AOP中均有使用。然后介绍了AOP中切面、切点、通知等抽象概念,并介绍了Spring中配置AOP的两种方式:基于注解和基于配置文件。实际上在Spring中基于配置和基于注解是“对偶”的,即注解在配置中有同等体现。

参考文献

  1. SharpCJ’s blog–Spring中面向切面编程
  2. https://docs.spring.io/spring-framework/docs/current/reference/html/core.html